
Note: There is now an updated guide
You may be interested in exploring the possibilities of network segmentation, but may not be sure what that looks like for your home network or the network of your small business. You don’t have the budget of a large corporation. You can’t afford the resources that they can, but nonetheless, you want to ensure your network is ultimately secure.
Securing your network is more important than ever before. Consider the ubiquity of Internet of Things and mobile technology. More devices (your refrigerator, your printer, your physical security system) are finding their ways on to our small business and home networks. Furthermore, Internet of Things devices are often more cheaply produced and less secured by default then traditional devices. This explosion of new attack surface forces network segmentation to become a necessity for anyone looking to defend their data.
In this article, we’ll show how network segmentation can be accomplished inexpensively using accessible equipment. In other words, this is our guide to do-it-yourself network segmentation.
To illustrate our point, we will be using the Death Star from “Star Wars” to reinforce the importance of network segmentation.
Before We Begin: A Word to the Wise
The inexpensive SOHO Wi-Fi router you have at home might not come with every feature in the world. Things like VLANs, configurable bridging, support for multiple wireless networks/subnets, and flexible packet filtering may or may not be available. Don’t despair, though – there might be a way to unlock these more advanced networking capabilities. For some routers, there are alternative, open-source firmware images available that add support for features not offered by the vendor-provided firmware. For our example, we’ll be using a TRENDnet TEW-824DRU as our hardware platform because gives us relatively modern hardware (Wireless AC and Gigabit Ethernet) for a low price of $79. The default TRENDnet firmware is pretty capable for a SOHO device, but we’ll use the DD-WRT firmware since the router supports it and will give us an extremely powerful and flexible environment to work in. When choosing a router, make sure an open-source firmware is available for your model. Some retailers even advertise when a router is compatible with DD-WRT, or other open source firmware images like OpenWRT.
We won’t cover how to flash the router with DD-WRT, but follow flashing instructions carefully or you may end up with a pile of Bantha fodder (AKA, a bricked router).
And one more thing: While we will use DD-WRT in this example, the ideas and concepts presented here are applicable to other platforms, too. And remember to save and apply your changes often; you don’t want to lose all your hard work, after all.
DIY Network Segmentation
The disclaimer: Keep in mind this is not an exhaustive guide to all of the functionality or security features you could implement. For example, this is written with the understanding that the you know how to change your administrative password as well as why that’s a good idea.
- Planning
To best design your new network layout, identify each device and map out what access each device needs. For example, the controller for your tractor beam is cloud managed, so it shouldn’t need to talk to anything else in your local network. Your workstation needs internet access, and it needs to access the router’s management web UI. Next, your trash compactor needs to communicate with your local sanitation controller, as well as other trash compactors and elements of the sanitation system, but not the internet or the workstations, either.
NOTE: This is the most important part of the process! Make sure you’ve enumerated all of these requirements before you even begin. Do your research, talk to your vendors, maybe even dig into some packet captures to see what network traffic your devices are exchanging.
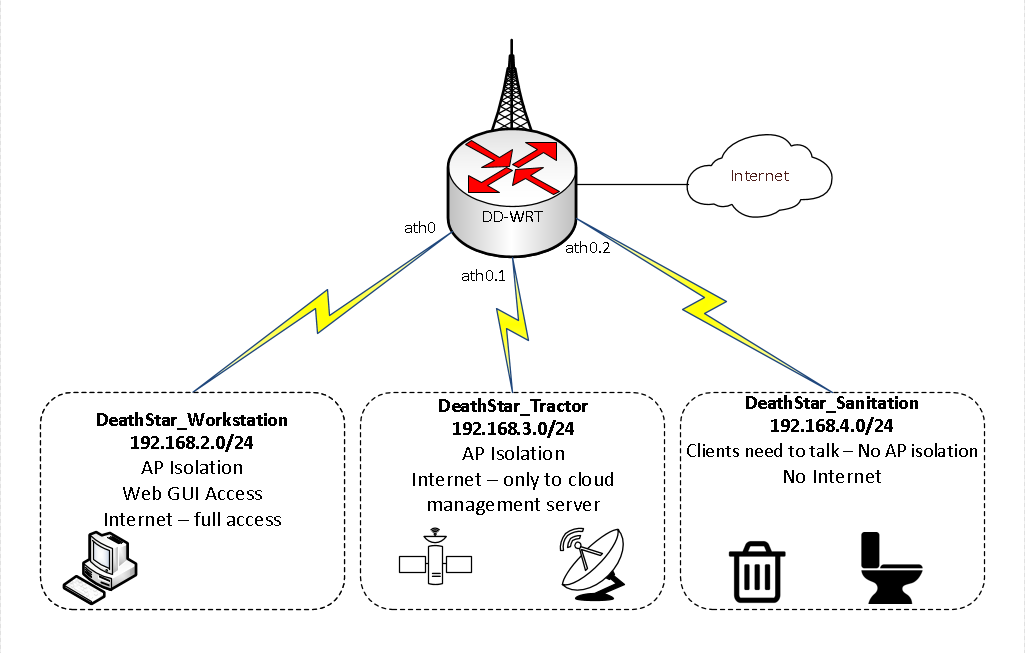
Based on our requirements, let’s create three wireless networks. We’ll name these according to their function: DeathStar_Workstation, DeathStar_Tractor, and DeathStar_Sanitation. Each of these networks will have a different IP subnet. We’ll keep the wired network on the default subnet 192.168.1.0/24 and use 192.168.2.0/24, 192.168.3.0/24, and 192.168.4.0/24 for our wireless networks, respectively.
- Implementation
Wireless Networks - (Note: in this example, we’re only setting up 2.4ghz wireless networks. If you need 5ghz, or both wireless bands, you’ll need to bridge the wireless networks together, or use separate SSIDs for 2.4/5ghz.)
First, go to Wireless → Basic in DD-WRT to set up your wireless networks. Disable ath0, the 2.4ghz radio. From there, configure ath1 with the Deathstar_Workstation SSID, check advanced and enable AP Isolation. Select unbridged network configuration and enable net isolation. Then, set the IP address (this network’s gateway) as well as the subnet mask.
The below image displays these steps (highlighted).
Under Virtual Interfaces, click Add to create two other wireless networks, Deathstar_Tractor and Deathstar_Sanitation, and configure them in a similar fashion. Leave AP Isolation disabled for the sanitation network; we need the various sanitation elements to be able to talk to each other.

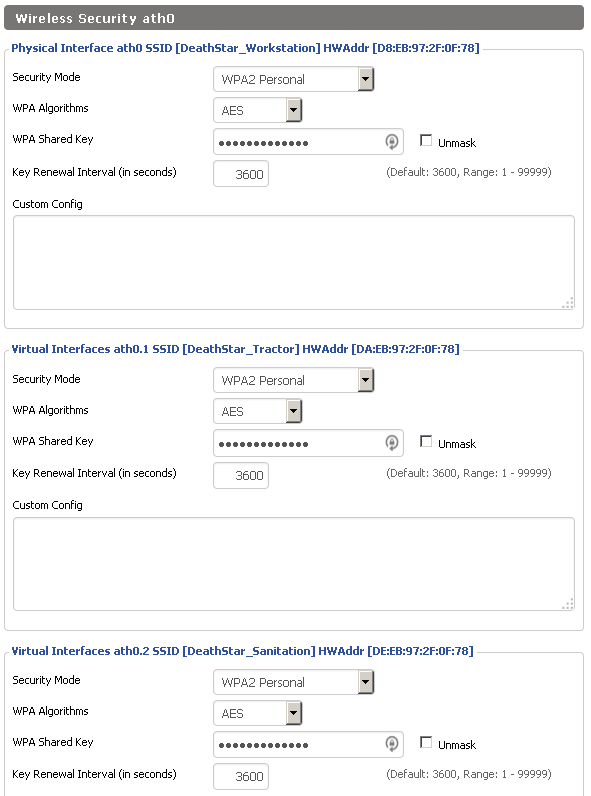
Now, go to Wireless → Wireless Security to set up security options for each network. Use WPA2 Personal (unless you’ve set up a RADIUS/CA/etc. in your environment to support WPA2 Enterprise) and AES. Set a unique, strong PSK (pre-shared key) for each network.
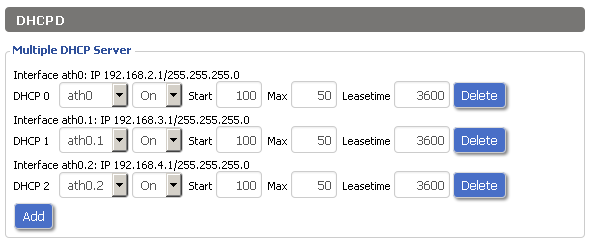
DHCP – If we want our devices to be assigned an IP address automatically by the router (a requirement for many IoT devices), we’ll need DHCP. To set that up, go to Setup → Networking and look at the DHCPD section. Add a DHCP server for the interfaces of each wireless network we’ve done (ath0, ath0.1, and ath0.2). (Note: This is a good area to stop what you’re doing, save, and apply changes).
Web Management – We’re mostly discussing segmentation in this write-up, but part of hardening any device is enabling transport layer security for network services, so let’s switch web management to HTTPS. Go to Administration → Management → Web Access, uncheck HTTP, and check HTTPS. Yes, this certificate won’t be trusted, but you’ll be prepared if you decide to install a “real” CA-signed cert in the future.
Firewall – Now, for the fun part! We’ll make sure our requirements in the above diagram are fulfilled by creating firewall rules with iptables. In DD-WRT, you can do this in Administration Commands. Type in your iptables commands and then click Save Firewall. Once you’ve saved some firewall rules, you can click edit to make changes before doing another Save Firewall.
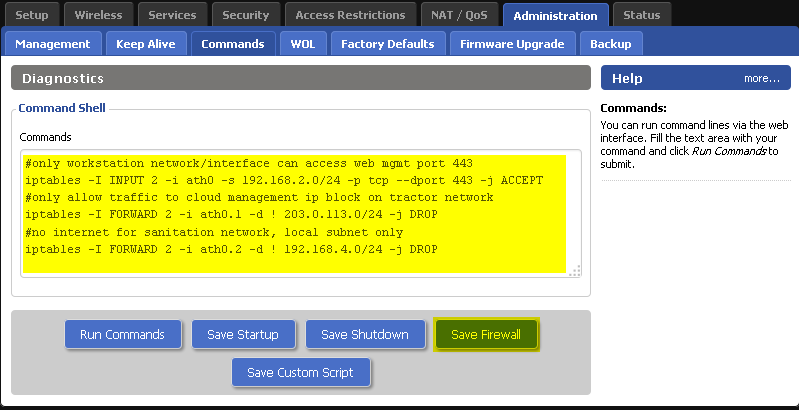
First, we put in a rule to allow only our workstation wireless network to access the router’s web management (otherwise only wireless clients could configure the router).
Our next firewall rule drops any traffic from the tractor network that isn’t directed to our tractor beam vendor’s cloud management infrastructure. This might not always be possible, but sometimes you can get IP information from the vendor/service provider, in this case the vendor let us know that their IP block is 203.0.113.0/24.
Finally, sanitation doesn’t need to access the internet at all. So, let’s drop all the traffic on the sanitation network that isn’t headed to another element on the sanitation network.
- Testing and Troubleshooting
We’ll want to ensure that traffic is going where it’s supposed to, but also confirm that it isn’t going where it shouldn’t (according to your requirements). For example, temporarily connect to DeathStar_Sanitation and verify you can ping the sanitation infrastructure. Then, verify that you can’t talk to the router, the internet, or the other local subnets.
Conclusion
You may have wondered what people were talking about when they talk about “proper” or “good” network segmentation. Hopefully, you now have some idea of how such segmentation is realistically achieved, without forking over buckets of wupiupi.
This guide is only to give you an idea of what’s possible in terms of segmentation; there are a myriad of configurations you could explore. There’s no reason wired networks can’t be managed as described here; you could even bridge wired and wireless networks together. You could utilize VLANs to allow multiple isolated networks to traverse one physical switch. You could make the firewall rules even stricter. You could set up logging and monitoring to identify anomalous network activity. These open-source firmware images provide considerable flexibility to set up your network, so be creative and play around to see what you can accomplish.
For More Information:
Subscribe to Bishop Fox's Security Blog
Be first to learn about latest tools, advisories, and findings.
Thank You! You have been subscribed.


